Telnet Email: access your email without a mail client
[This is article number 1 of the new "hacks" series. Read here if you want to know more about this]
In the beginning was the command line. Then, the evolution of software saw more and more complex graphical applications, able to abstract from low-level machine operations and make work much easier for the end user. All of this, of course, had a price: the loss of control. But we are not common users... and if there is one thing we want it is having control over what happens on our computers!
Let's think, for instance, about email: in most of the cases we can access our
mailbox with a browser, however only through an interface which has been already defined by our provider; this interface often contains advertisements and forces us to stay connected while we read our mails. We can configure an email client and make it download our messages from the server, however this choice has its drawbacks too: what should we do, for instance, if the computer we are using is not ours? The solution to this problem is very easy: let's come back to the origins, manually executing all the operations that an email client automatically performs whenever it downloads our emails from a server. The only tool we need is available on any computer: its name is telnet and it can be called from the command line (that is from Windows "command prompt" or from MacOSX and Linux Terminal). The data we need to know in advance are just the address and the port of our mail server, which are usually specified by our providers within the howtos for mail client configuration, together with our account's login and password.
Mail servers
Mail servers available on the Internet usually belong to one of two different
categories: outgoing or incoming mail. The former ones usually use SMTP (Simple Mail Transfer Protocol) and are accessed to send messages, while the latter ones use either POP3 (Post Office Protocol 3) or IMAP (Internet Message Access Protocol) and are the ones we will describe more in detail in this article, as they are used to download messages from a mailbox to our computer. Most of the times mail server addresses are built starting from your email address domain name and adding a prefix witch matches the protocol used: for instance, for gmail.com emails the outgoing server is called smtp.gmail.com, while the incoming ones are called pop.gmail.com and imap.gmail.com. A last parameter you have to specify to connect to a server is the port: the default values are 110 for POP3 and 143 for IMAP.
Let's keep things private
Before starting, however, you have to be aware about the following: every time you connect to one of the ports we just described, your data will be transferred in clear. This means that anyone would be able to read what you write just by sniffing the packets that are sent over the network. Luckily, some mail servers also accept encrypted connections (see below): in this case, the default ports are 995 for POP3 and 993 for IMAP. Finally, it is good to remember that all the information you send, independently from the fact that you are using an encrypted connection or not, are shown on the screen, so you'll better check that nobody's near you before entering your password...
NOTE: for those mail servers which, like gmail, require an encrypted connection, you can't just have a simple telnet connection. However, you can use the openssl program (available here). The syntax to connect is the following:
openssl s_client -connect <server name>:<port>
For instance:
openssl s_client -connect pop.gmail.com:995
Connect to the server
After you have chosen the connection type and verified you have the correct data, you can finally connect to your mail server using telnet. To do this you first have to open a terminal: from the Start menu in windows, select the Run option, write the "cmd" command, then press Enter; if you have a Mac, choose the Terminal application from the folder called Application/Utilities; in linux you can find it in the Utilities or Tools section (or you can have a full screen terminal by pressing the keys CTRL+ALT+F1). Once the terminal is open, you can connect to the server by writing
telnet <server address> <port>
For instance:
telnet pop.mydomain.com 110
If the connection is opened correctly the server replies saying it is ready to
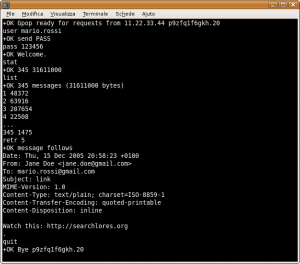
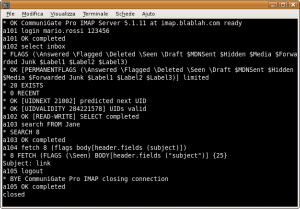
receive commands. Images show the main commands you can run on a POP server and below you can find different examples of connections both to POP and IMAP servers. IMAP servers are a little more complex than POP (for instance, every command has to be preceded by a tag containing an incremental value), however it is much more powerful at the same time, as it allows you to manage your mail in folders and mark messages with specific flags. All you have to do now is experiment with this new tool, maybe a little spartan but with no restrictions imposed by proprietary interfaces, and find new ways to manage your email with telnet.
POP3
The POP3 protocol is quite easy and follows the specs which appear inside RFC1939. Here's a list of the main commands:
- USER <username>: specifies your email account's login
- PASS <password>: specifies (in clear) your email account's password
- STAT: shows the number of messages in the mailbox and the total space they require
- LIST: shows a list of messages with their size
- RETR <message id>: shows the message identified by "id"
- TOP <message id> <n>: shows the first <n> rows of the message
- DELE <message id>: deletes the specified message from the server
- RSET: resets all the DELE operations previously performed (within the same session)
- QUIT: quits the POP3 session and disconnects from the server
IMAP
The IMAP protocol follows the specs of RFC3501 and is far more complex than POP3. For this reason, instead of a list of commands we just show a session example, suggesting you to check the RFC or to search for "IMAP and TELNET" to get more details.
 01 LOGIN <login> <pass>             authenticates on the server
 02 LIST "" *                        shows the list of available folders
 03 SELECT INBOX                     opens the INBOX folder
 04 STATUS INBOX (MESSAGES)          shows the number of messages in the current folder
 05 FETCH <messagenum> FULL          downloads the header of the specified message
 06 FETCH <messagenum> BODY[text]    downloads the body of the specified message
 07 LOGOUT                           disconnects from the server


Leave a comment