WordPress in a (Virtual)box
Looking for some cool material for a new class at SUPSI DFA, I recently had a chance to experiment with Virtual Appliances. The main idea is the following: to setup most Web applications you need not only the applications themselves, but a whole set of softwares they depend on, (e.g. a web server, a database, a language interpreter), some additional apps to manage your data (e.g. phpMyAdmin to administer your MySQL database), and of course configurations for all of them; a virtual appliance is a self-contained virtual machine where everything, from the OS to every bit of code you need, is already installed and configured so that you won't need to worry about setting up your system, but you will be immediately able to start working with it.
There exist different VA providers, such as Bitnami, Turnkey Linux, and JumpBox. Each one has its own peculiarities: for instance, JumpBox uses proprietary software (as far as I learned from here) and to get VA images you need to pay a subscription; Bitnami does not only provide virtual machines, but also native installers for Windows, Linux, and Mac, and all of these are free; TKL, also free, is oriented to more technical users and should be better if you plan to extend the VA with other services, as (since August 2012) it is based on a standard Debian installation.
Ok, ok, now I guess you are curious about what virtual appliances are actually available. Of course you can find WordPress (e.g. here and here) as in this post's title, but also content management systems such as Drupal and Joomla, wikis as MediaWiki and MoinMoin, torrent servers, Web frameworks such as Django, developers stacks (e.g. *AMP, *APP), and revision control servers. So I guess this post is going to provide you a veeeery limited view on what you can do, but I hope it will at least stimulate some curiosity in you (then probably other posts will follow with new discoveries… ;-)).
My first experiment with these VAs has been with Bitnami's WordPress. There are three ways to install it: using the native installer, with a VM image or directly deploying it in a cloud, e.g. on Windows Azure or AWS. The native installer on Mac is quite straightforward: you install it, provide (relatively) few configuration parameters, and voilà, you are ready to connect to your IP address (port 8080) and use your new WordPress or access your DB via phpmyadmin. All of this without being scared by the presence of all these new softwares in your system: everything is self-contained in one directory and does not interfere with existing software. For instance, I already have a MySQL instance running on my Mac and I just needed to provide a different port to make the two coexist.
This is very convenient if you want to test a new Web application. Its main limitation, however, is that it runs on your own PC, so if you want to make that WordPress website (or in general any Bitnami system you are running) accessible somewhere in the cloud, starting with a virtual appliance is going to make your life much easier.
Running the virtual appliance is also quite simple both with VMWare and with Virtualbox. In the latter case, converting the virtual disk from the VMDK (VMWare) to the VDI (Virtualbox) format is required. Be sure you check the virtual appliances quick start guide here, then perform the following steps.
Step 0: as a pre-requirement, I suppose you already have a recent version of VirtualBox installed. The one I am working with now is 4.2.6. If you don't, get one here.
Step 1: download the latest virtual appliance image file (e.g. for WordPress, get it here) and unzip it (at the time of writing this post, the filename is bitnami-wordpress-3.5-0-ubuntu-12.04.zip). This will create a new directory with the same name of the file (except the ".zip" extension, of course).
Step 2: check the contents of the new directory. You will find a list of files like the following one:
README.txt
VirtualBox-4-README.txt
bitnami-wordpress-3.5-0-ubuntu-12.04-VBOX3.mf
bitnami-wordpress-3.5-0-ubuntu-12.04-VBOX3.ovf
bitnami-wordpress-3.5-0-ubuntu-12.04-s001.vmdk
bitnami-wordpress-3.5-0-ubuntu-12.04-s002.vmdk
bitnami-wordpress-3.5-0-ubuntu-12.04-s003.vmdk
bitnami-wordpress-3.5-0-ubuntu-12.04-s004.vmdk
bitnami-wordpress-3.5-0-ubuntu-12.04-s005.vmdk
bitnami-wordpress-3.5-0-ubuntu-12.04-s006.vmdk
bitnami-wordpress-3.5-0-ubuntu-12.04-s007.vmdk
bitnami-wordpress-3.5-0-ubuntu-12.04-s008.vmdk
bitnami-wordpress-3.5-0-ubuntu-12.04-s009.vmdk
bitnami-wordpress-3.5-0-ubuntu-12.04.vmdk
bitnami-wordpress-3.5-0-ubuntu-12.04.vmx
All those .vmdk files are parts of the hard disk image that needs to be converted in the format used by Virtualbox. To do this conversion open a terminal, cd to the new directory and enter the following command (all on one line):
VBoxManage clonehd bitnami-wordpress-3.5-0-ubuntu-12.04.vmdk bitnamiWordpress.vdi -format VDI
A new file called bitnamiWordpress.vdi will be created. This will be your new virtual machine's hard disk: you can move it to a place you will easily remember (see Step 5) and delete everything else from this dir.
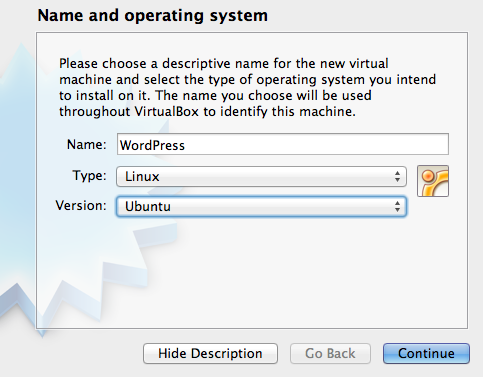
Step 3: open Virtualbox and hit the New button to create a new virtual machine. A window will open (see Figure 2) asking the name and OS for the new machine. Name it as you like, and choose Linux/Ubuntu as OS.
When asked for the amount of RAM, choose anything above or equal to 512MB. In the following window, choose "Do not add a virtual hard drive" and confirm your choice. After this step your new VM will be created, but you still have to explicitly link it to the disk image you previously created.
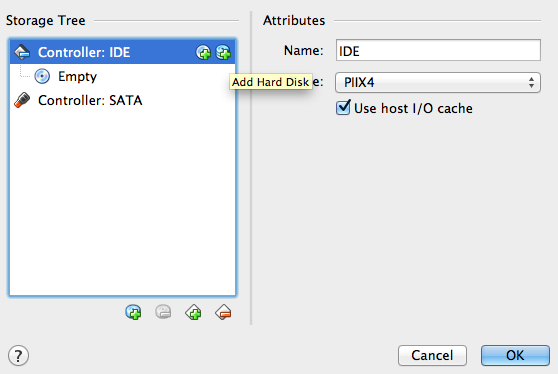
Step 4: choose your newly created VM and hit the Settings button. In the Storage tab you will find the list of disks attached to the VM (you should have only the "Empty" IDE CD if you followed the previous steps). Highlight Controller: IDE and click on the Add Hard Disk icon (see Figure 3). When asked whether to create a new disk or add an existing one choose the latter, then provide the path of the VDI image you created in Step 2.
Step 5: as a last configuration step, go to the Network tab and make sure your network adapter is enabled and configured as bridged (see Figure 4 - of course the adapter name might change according to which one is active in your system).
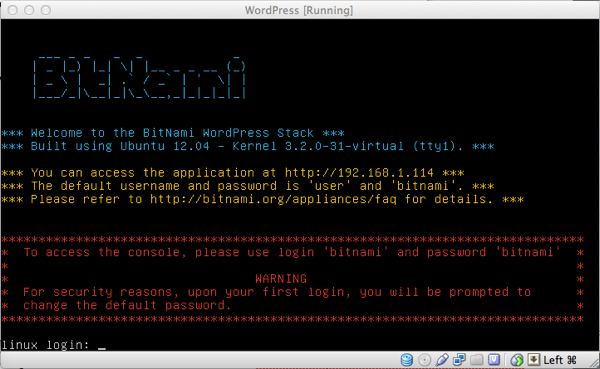
... Et voilà, the VM is ready: start it and if everything went fine you should be shown the following screen:
Note that you are provided an IP address (in this case 192.168.1.114): open your browser, connect to it and...
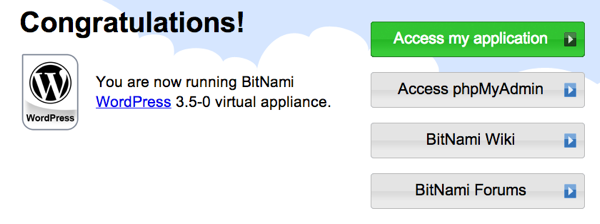
… enjoy! :-)
